A SIMPLER Architecture
SwiftUI is an excellent framework for application development, especially for prototyping. But in order to build good apps, we need sound architectures. I found that architectures like MVC and MVI—Model, View, Controller, and Model, View, Intent—were insufficient for my purposes, and came up with SIMPLER as a way to organize some of the patterns I was seeing, most strongly in game development patterns, the Elm architecture and ObservableStore.
New technologies like SwiftUI, Combine and Realm allow more convenient ways of packaging views, models, event handling and asynchronous processes than ever. SIMPLER reformulates the traditional model-view-controller paradigm to account for these new means of app development, instead of relying on the concepts of scenes, interfaces, models, pipes, logic, events and resources.
MVC Architecture
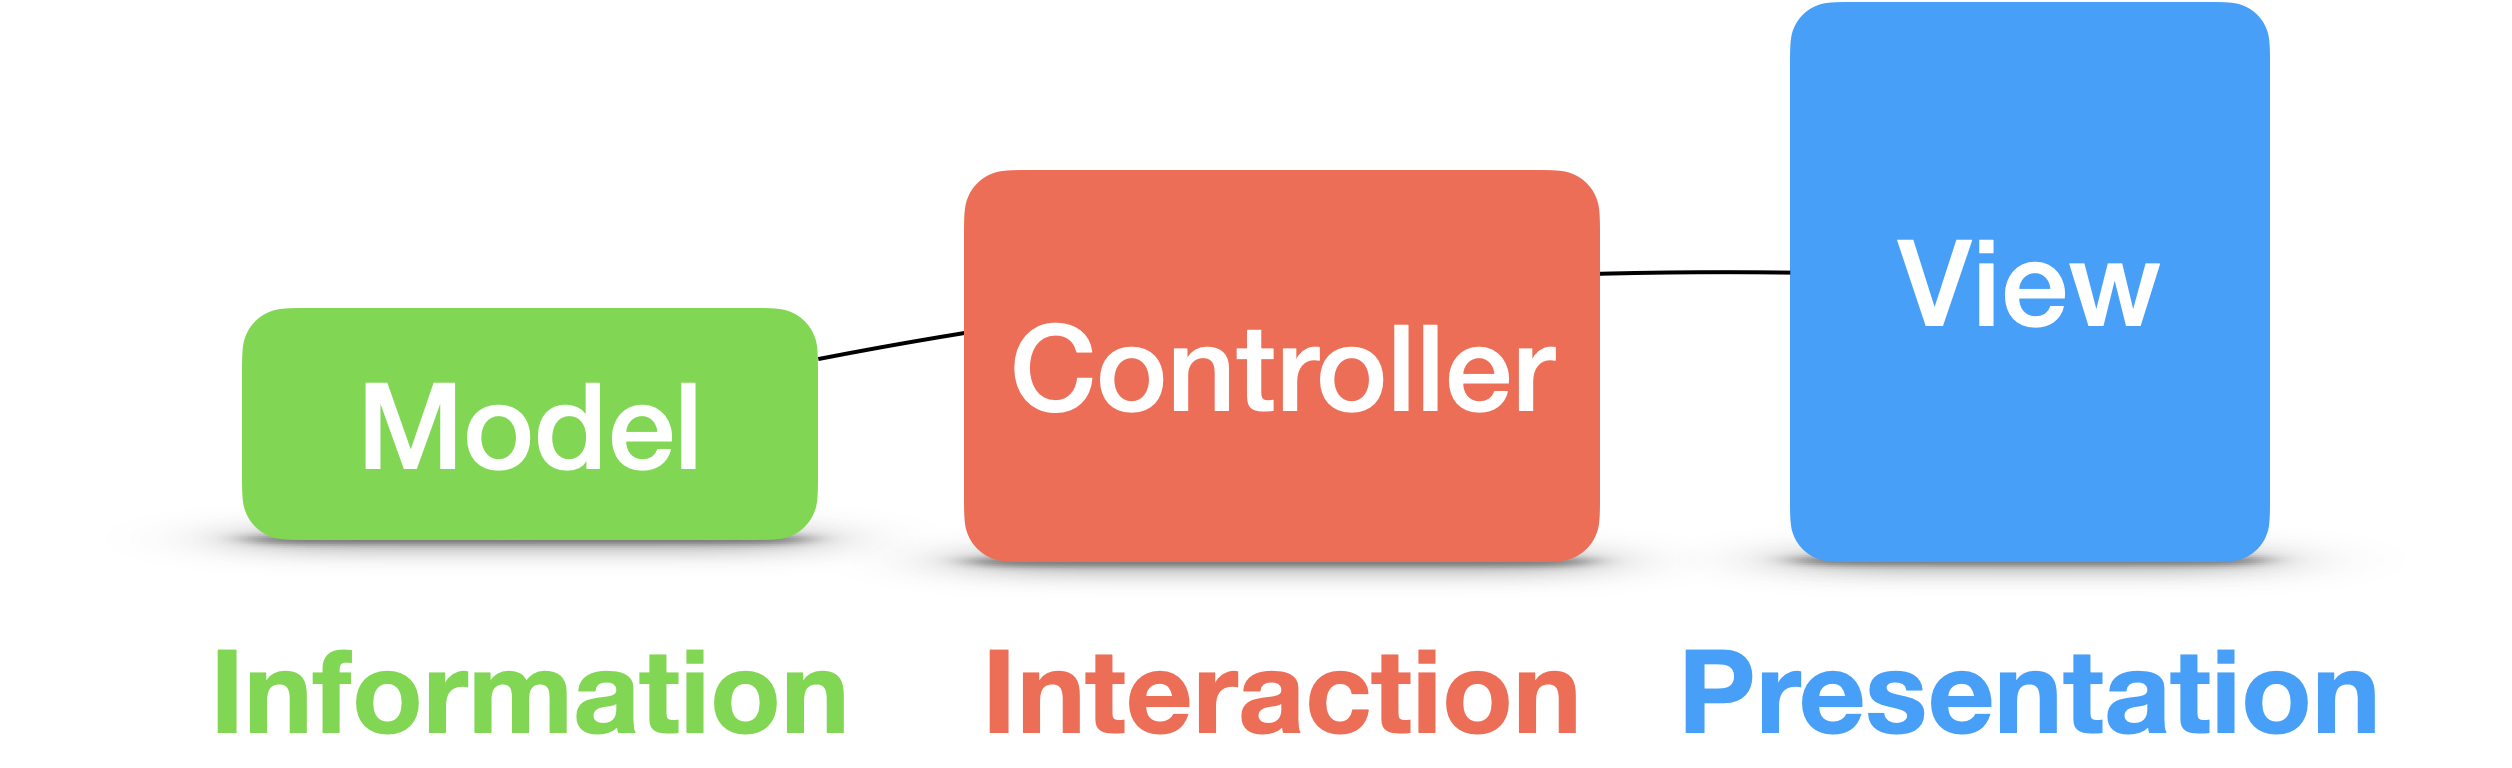
When we build applications, we bring together systems of information, presentation and interaction. Apps take information entities, present them to the user on screens, and allow the user to interact with them. In doing so, developers will often split their systems into “objects” and categorize these objects into the categories of data (information), display (presentation) and update (interaction).
App architectures are meant to aid in this categorization process, giving us patterned ways to sort and structure these objects. Specifically, they answer questions about where to store and how to update the app’s data, how to present that data on screen, and how to distribute logic and handle interactions.
The canonical architecture is MVC, or Model-View-Controller, which is a direct mapping from the main aspects of an app: information, presentation and interaction. Models handle information, views take care of presentation, and the controller is in charge of interaction.
While MVC provides an adequate understanding of apps at their highest level, it fails to inform us fully of their “architectures”. Instead, developers are left to figure out how to connect up these pieces and make them work together. While models and views are fairly clear cut in their handlings of data and displays, the controller is more nebulous in its purpose, often becoming the de facto location for everything else.
Other architectures have attempted to address this “MVC”, or Massive View Controller, problem by decomposing the controller. MVVM (Model, View, View Model) prescribes the use of more modular view models, however it doesn’t make it any clearer how we should approach using these. VIPER (View, Interactor, Presenter, Entity, Router) goes a step further and breaks controllers into Interactors (business logic), Presenters (view logic and user input) and Routers (navigation).
I’d like to take a similar approach to VIPER, decomposing MVC into a clearer, more descriptive set of objects—a SIMPLER set, if you will. Particularly, I’d like to build off the patterns exhibited in Redux, Elm and reactive frameworks in general, which attempt to provide the app developer with a simpler experience, and apply these in the context of a SwiftUI application. While tuned specifically for SwiftUI, I believe the principles hold for other frameworks.
Reactive Frameworks
As stated above, apps present information entities and allow interactions with them. These interactions produce updates which change the information entities (and in turn, change the presentation). We call this whole process the “update loop”.
Reactive frameworks are driven by a desire to simplify the update loops within applications, by eliminating the need to manually refresh the displays. Instead, displays form dependencies with data, and react to their changes by automatically refreshing.
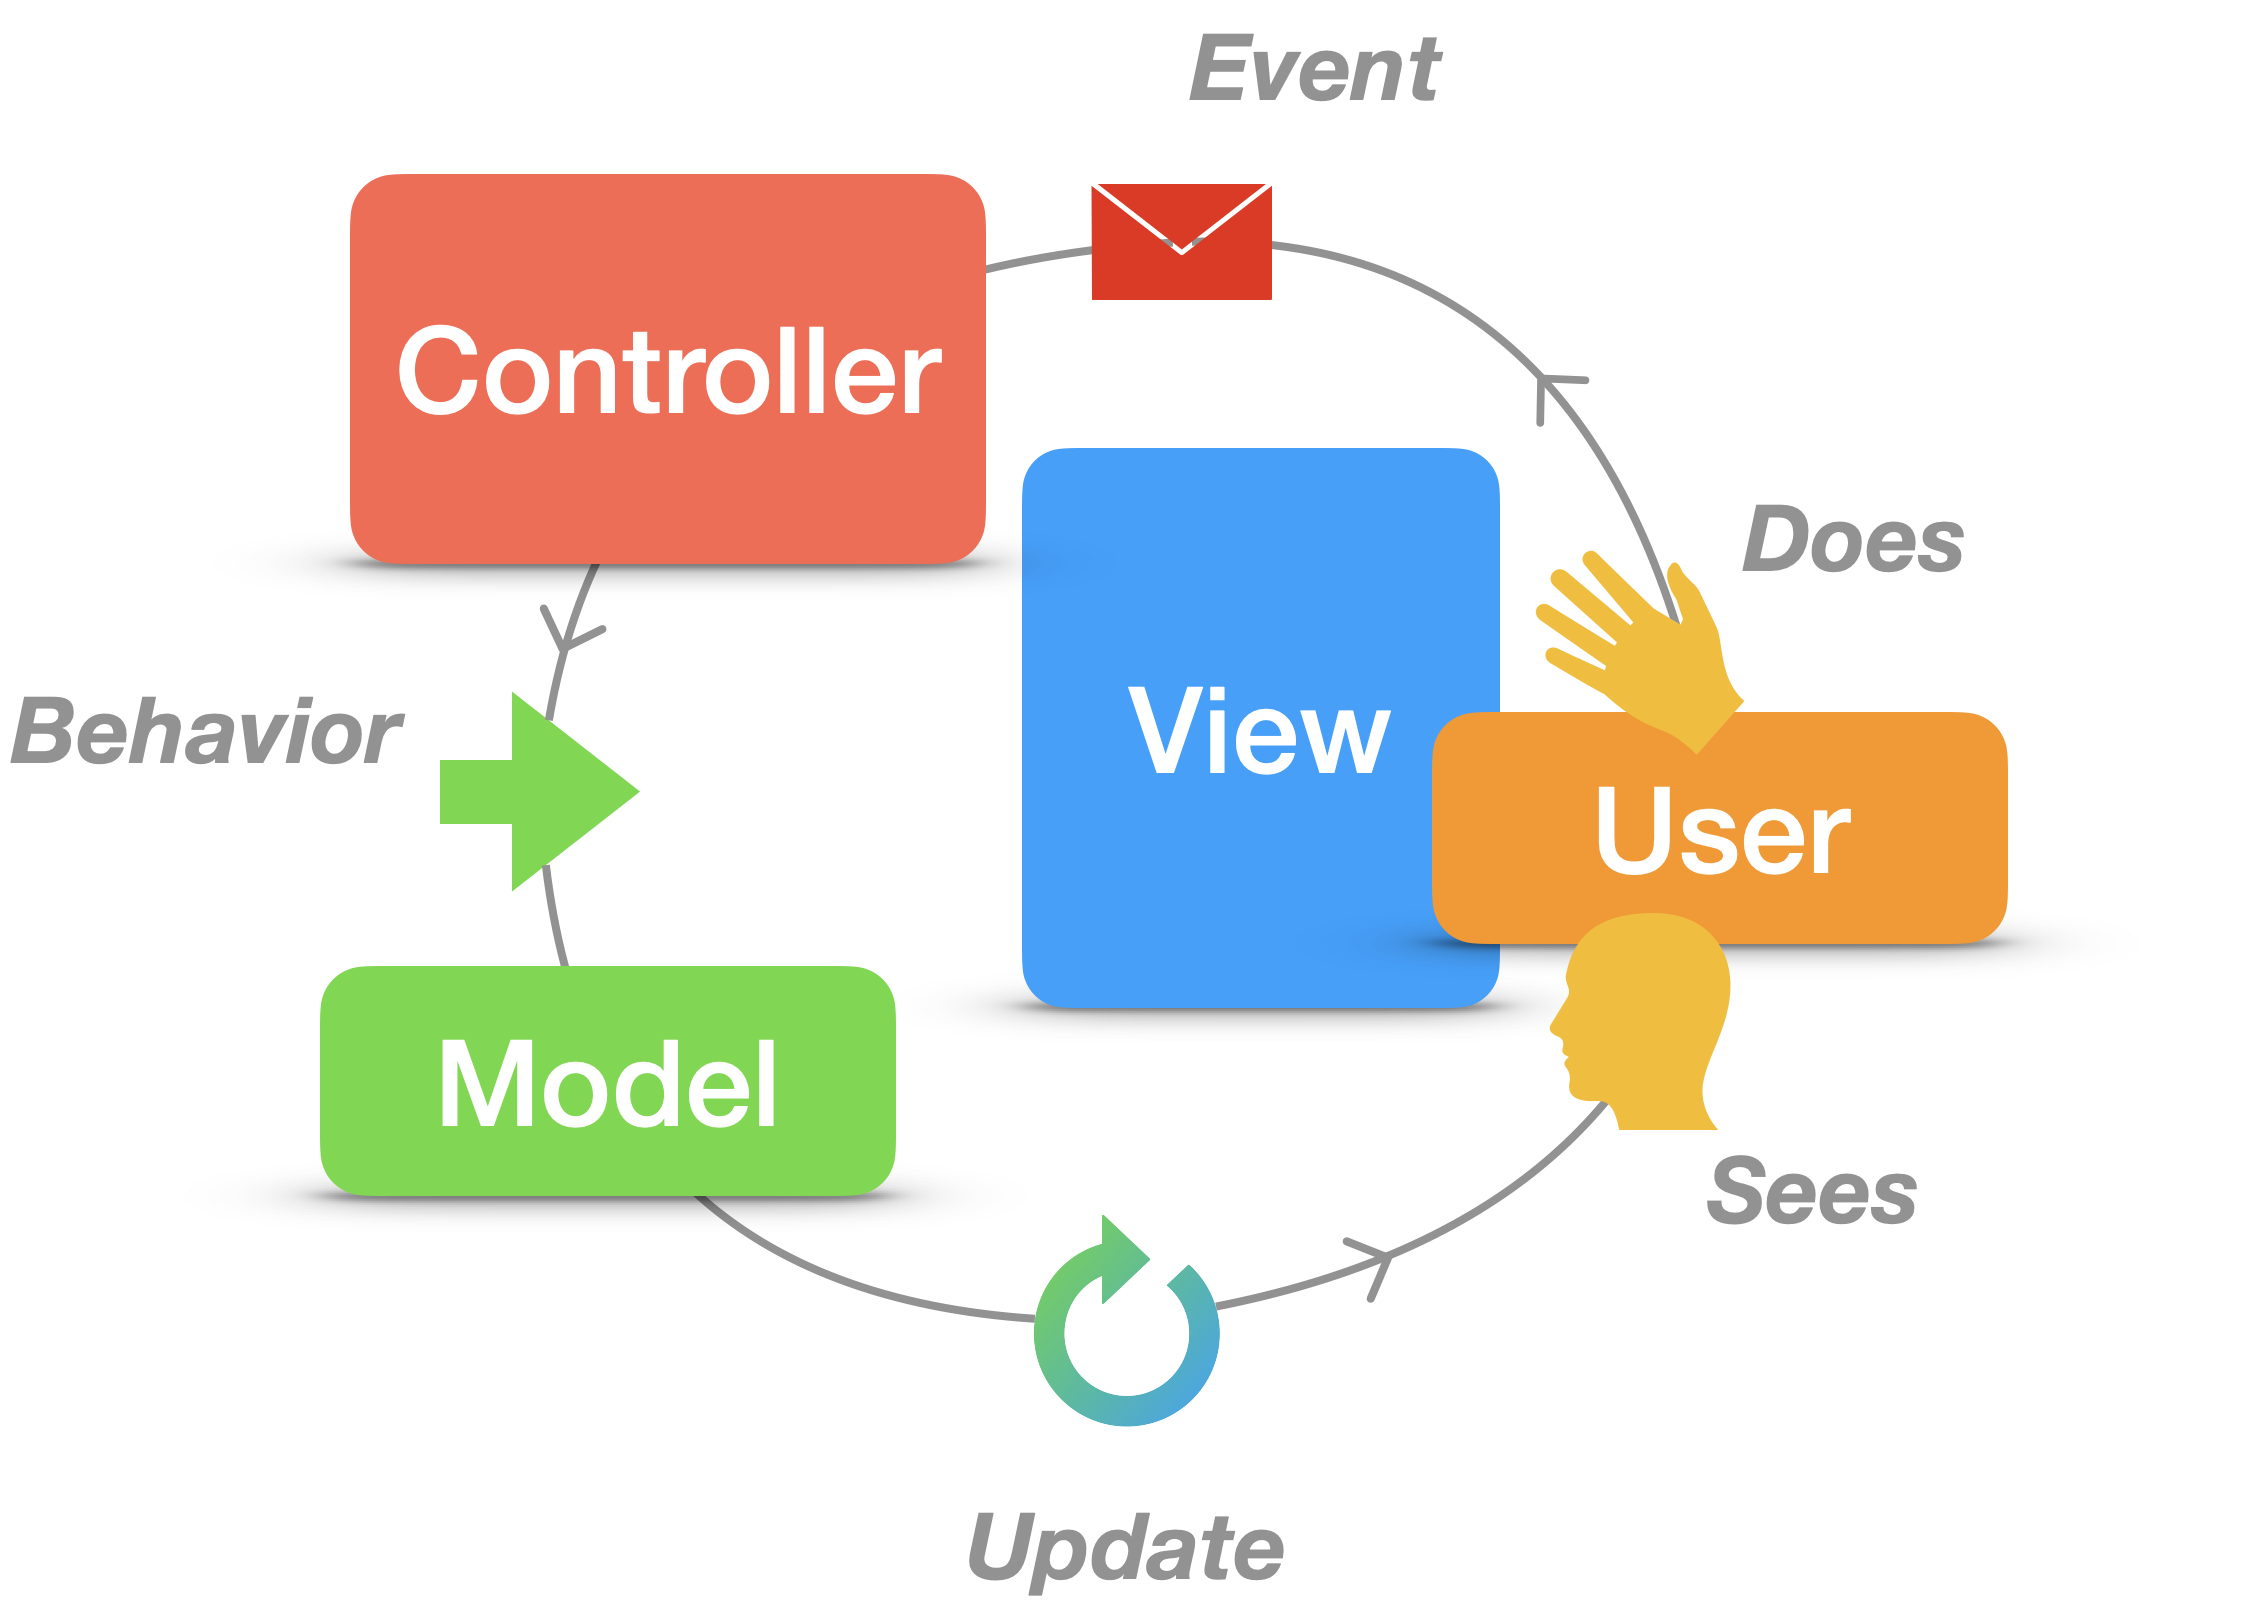
We can explore a model of this update loop here, which transforms human input into app events, into behaviors applied to objects, resulting in updated content being shown to the user. The user sees, the user does, then the user sees, and on and on.
An Architecture for Reactive Frameworks
Design is separating into things that can be composed.
Rich Hickey
When we thought about designing applications in Mobile Design, we broke apps down into a set of things: Text & Graphics, Objects, Behaviors, Events, Gestures, and Modes.
Architecture gives us ways to compose these things, to put them together into a unified whole. This process of composition quickly becomes complex as we attempt to manage the relationships between all of the things relevant to the app. In order to fight this complexity, we can engage in a process of stratified design, or “the notion that a complex system should be structured as a sequence of levels that are described using a sequence of languages” (SICP).
So how can we break our apps into “a sequence of levels” that we can describe with “sequences of languages”? Well, we can first return to our definition of apps as systems of information, presentation and interaction. We take data from the information level, display it on the presentation level, and update it via the interaction level—store, show, change.
Within each of these levels, we’ll need “sequences of languages” to describe them. We’ll address these now.
Information
In MVC, models hold information. A model might describe a data object directly, or it might describe a store of data, a “repository” of data objects. In SIMPLER, “M” stands for—surprise, surprise—models. I’ll attempt to clarify further the language of these models, and understand how this level of the system operates. We’ll think of models as Objects. These Objects are represented on screen as Text & Graphics and have Behaviors, which change the properties defining these Objects.
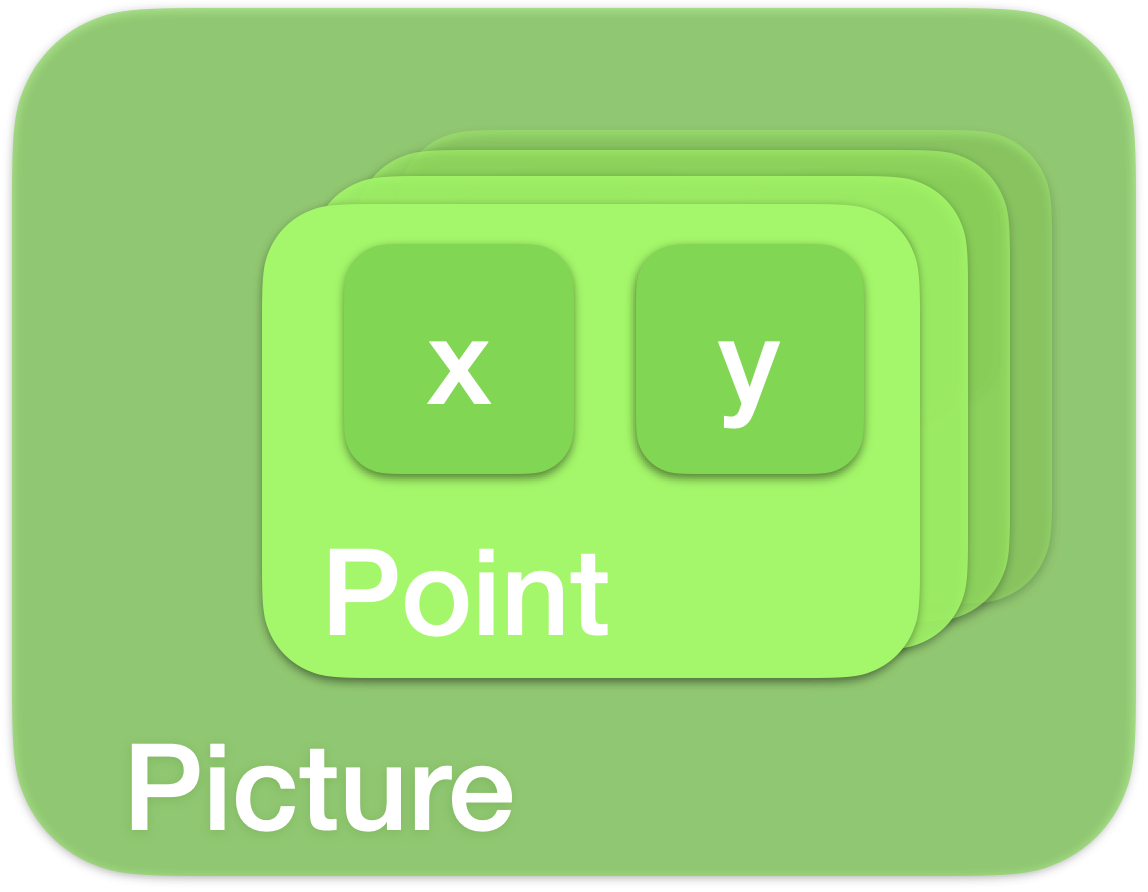
We generally think of a model as an entity, an "object" living within our application. This entity's job is to store information, in a structured way. It does this job through relationships to other models. These models may be small self-contained, like a string or an number, or they may contain other models. For example, a point model might hold two numbers, describing the x and y components of a two-dimensional point.
Models serve not just to store information, but to give it structure. The type of a model describes what it is, and if a model contains other models, the names of these relationships describe what they are, like the "x" and "y" of a point. These descriptions allow our application to make sense of each different type of model, and know how to read it's stored information. The logic of our application, which we'll touch on later, describes how we can write to these models.
Presentation
In MVC, views present information through Text & Graphics. We may craft this presentation ourselves, using low-level text and graphics engines to transform data into visual representations, or we may use higher-level views, which handle this presentation for us, allowing us to provide just with information that it knows how to display.
In SIMPLER, we use two levels to describe the aspects of presentation, scene and interface.
Scenes describe the top-level decomposition of our app, and can be thought of as “wrappers” around the remaining levels. They group information, presentation, and interaction into a bundle, allowing us to divide our apps into a “sequence of languages”, with the flexibility to have as many scenes as we choose. Some apps will choose a monolithic scene approach, grouping all objects into one Redux-style bundle. This minimizes the pain of data dependencies, as all data is on hand for the interfaces to make use of.
Interfaces can be more directly equated with our traditional notion of “views”, describing a section of the screen that shows Text & Graphics and manages Gestures. Interfaces serve as the meeting points between human and digital representations. As Volker Grassmuck puts it, the interface is the “visible 'tangible' surface of media, the nexus point or gateway between man and media, i.e. the world”. We can think of our app as an Interface made up of many interfaces.
Our scenes bring together sets of interfaces, like images, text editors or buttons, marrying the visual and gestural experience between multiple types of displays and controls. In this, they organize the “tangible media surfaces” within our apps.
Interaction
Interaction is how the wheel of our apps spin. We have a lot of different names for this process: controller, view model, intent. In general, our interactions are managed by a system of components. We want something that represents something that should happen. MVI calls these “intents”, but most refer to these objects as events. Next, we need something that transports these events to the place where the something will actually happen. We will refer to these transport channels as pipes. The actual changes, the "responses" things that happen, is the logic within our app.
In order to make reusable pipe-logic-event abstractions, we can define resources. In our apps, the most critical rule is that we don’t interrupt the main interaction loop. Resources, sometimes referred to as “services”, help us manage these “background” processes that occur over time, or that will take a long time. They say that time is the most precious resource, and we’ll say that resources help manage this precious time.
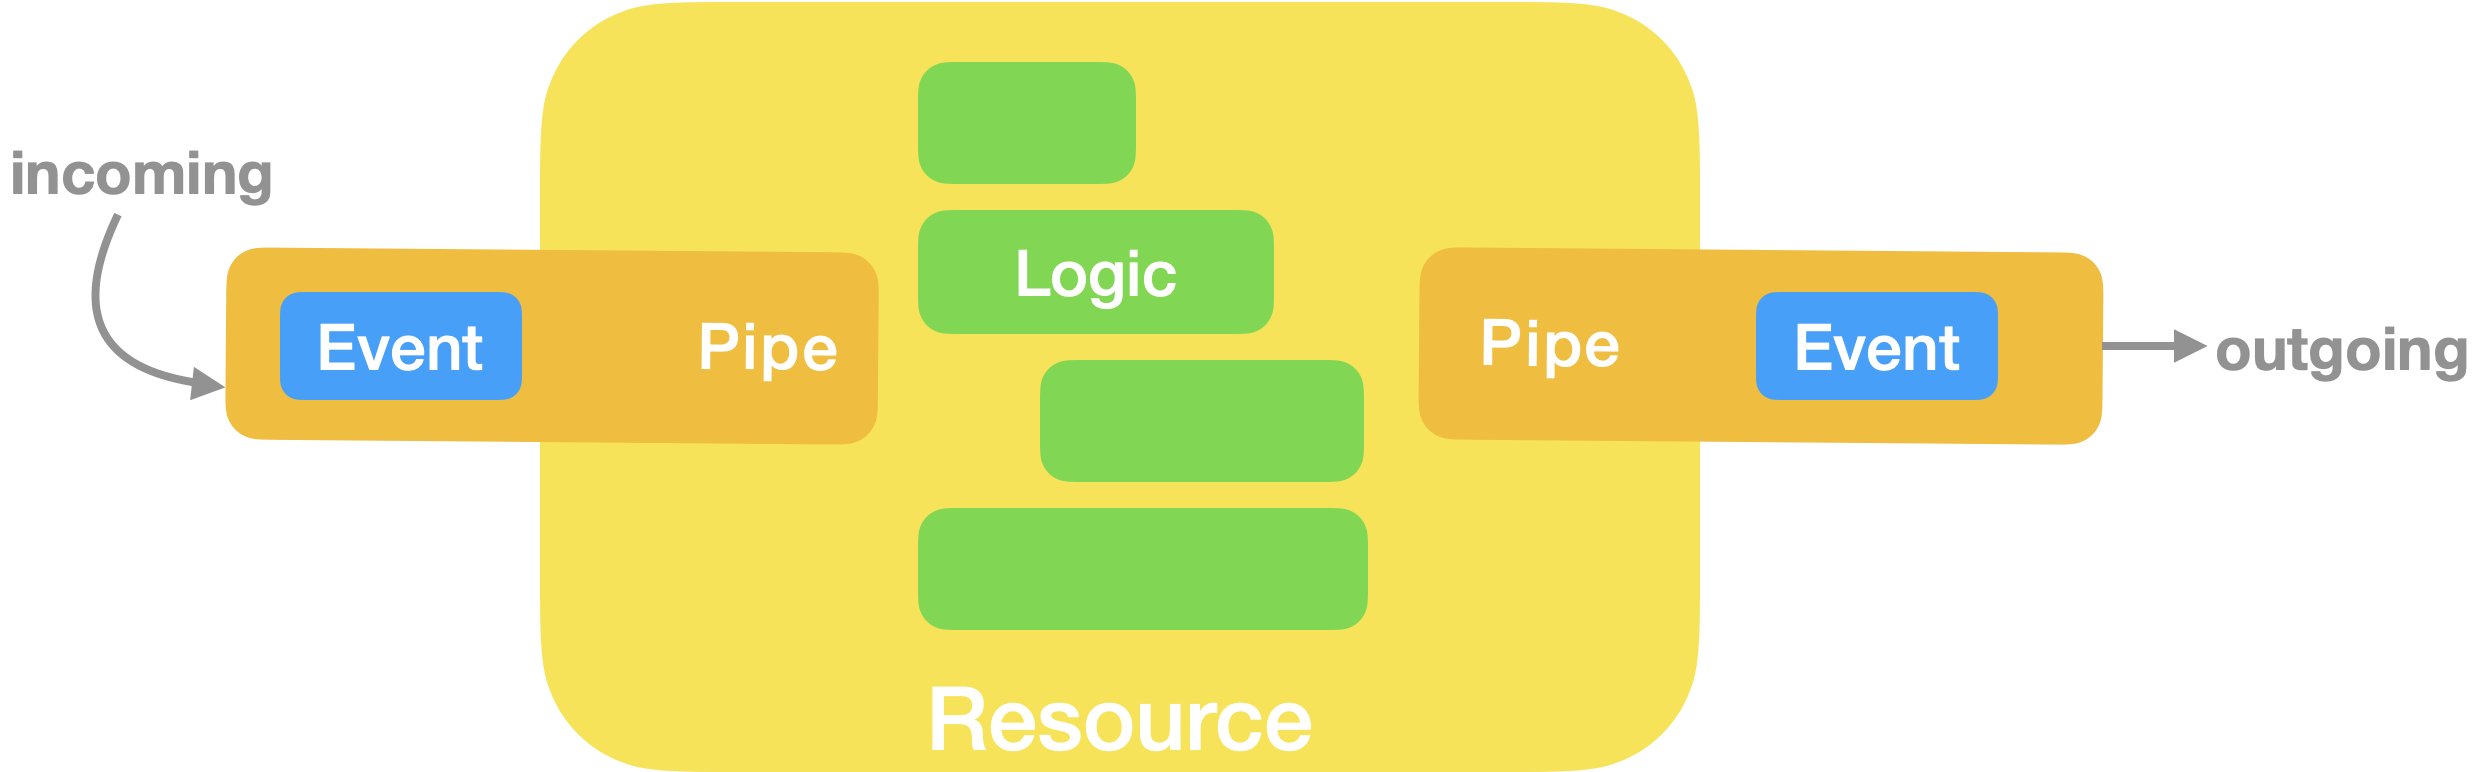
Because these resources may interrupt the main loop, we’ll want to sequester them away from the main loop of interaction, giving them their own processing loops, and pipes to communicate events back and forth with the main loop.
SIMPLER Counter
Let’s jump into some code. We’ll build a simple counter that the user can increase and decrease. Let’s run through the things—the Text & Graphics, Objects, Behaviors, Events, Gestures and Modes— and look at how we would build it in SwiftUI with SIMPLER.
Text & Graphics
We want to show only one piece of data, the count. This will be an integer that we will display inside of a Text display. In addition, we’ll want two buttons, which we’ll represent through the text strings “Increase” and “Decrease”. To emphasize these are buttons, we’ll use a graphic background—a rounded rectangle.
Text("\(count)")
Button("Increase") { \* increase count *\ }
Button("Decrease") { \* decrease count *\ }
We’ll want to provide some order to these three components, so we’ll wrap them in a VStack, which stacks them vertically, centered in the screen.
VStack {
  Button("Increase") { \* increase count *\ }
  Text("\(count)")
  Button("Decrease") { \* decrease count *\ }
}
Objects
Because our only data is the count, we only need one object–an integer. In SwiftUI, the simplest way to make this object reactive is to wrap it with a @State property wrapper.
@State var count: Int = 0Behaviors
We want our object to be able to increase and decrease in value, so we’ll give it two behaviors: increase and decrease. We can define this behavior, or logic, in a number of locations (in the view, in a store, on the object). We’ll choose here to do so on the object.
extension Int {
  func increase() -> Int { self + 1 }
  func decrease() -> Int { self - 1 }
}
Events
We could trigger this behavior directly on the button tap. Some may even argue that’s the simpler way of doing things. I want to make a point here by not doing this. In SwiftUI, the Views end up being the heart of the application. In order to make these as lightweight as possible, we’ll want to keep as much logic outside of them as possible, behind function calls or event handlers. This makes them easier to work with and more reusable.
In this case, we’ll use a lightweight event handler. But first, we need to define our events. We have two: increaseCount and decreaseCount.
enum Event {
  case increaseCount
  case decreaseCount
}
In order to trigger these behaviors, we need a way of sending the events from the views to be handled elsewhere. In this case, we’ll simply define an event handler as a function in our View, and allow our buttons to call to this function.
struct CounterView: View {
  @State var count: Int = 0

  var body: some View {
    VStack {
	  Button("Increase") { send(.increaseCount) }
	  Text("\(count)")
	  Button("Decrease") { send(.decreaseCount) }
	}
  }

  func send(_ event: Event) {
    switch event {
	  case .increaseCount:
		count = count.increase()
		break
   	  case .decreaseCount:
		count = count.decrease()
		break
	}
}
Gestures
In this case, the Buttons we defined handle interactions through tap gestures. When they are tapped, they fire an action. Alternatively, we could have built our own buttons, but we’d miss out on some “out-of-the-box” platform features, like animations, platform-specific views, and accessibility.
But, if we wanted to, we could define our own button from parts, like the following:
Text("Decrease")
  .padding()
  .contentShape(Rectangle())
  .onTapGesture {
	send(.decreaseCount)
  }
Modes
Don’t tell Tesler, but we’re going modeless. Since this counter is so simple, with only two instances of one type of interaction, there’s no need for modes here.
If there was, we would make use of it in two locations. First, we might change the Views presented. If we take an example of an app that can be in either a editing or viewing mode, we might display a "Done" button to exit the editing mode.
enum Mode {
  case editing
  case viewing
}

@State var mode: Mode = .editing

var body: some View {
  switch mode {
  case .editing: Button("Done") {...}
  case .viewing: ...
  }
}
Additionally, we might want to handle events differently, depending on the mode. This is why we typically forward actions to an event handle, as it can serve as the place for this uglier code.
func send(_ event: Event) {
  switch event {
  case .buttonTapped:
    switch mode {
    case .editing: ...
    case .viewing: ...
    }
  }
}
The former assures all events are handled, with each specifying if it is handled differently in different modes. The latter allows each mode to define a subset, though some events will need to be re-handled for behavior that is consistent across modes.
Mapping to SIMPLER
Now that we have built up a simple app (a combination of Text & Graphics, Objects, Behaviors, Events, and Gestures), we can go back and connect all of these pieces to their SIMPLER counterparts.
// S: Scene
struct CounterView: View {

// I: Interface
  var body: some View {
    VStack {
	  Button("Increase") { send(.increaseCount) }
	  Text("\(count)")
	  Button("Decrease") { send(.decreaseCount) }
	}
  }

// M: Model
  @State var count: Int = 0

// P: Pipe
  func send(_ event: Event) {
    switch event {
    case .increaseCount:
      count = count.increase()
      break
    case .decreaseCount:
      count = count.decrease()
      break
    }
  }
}

// L: Logic
extension Int {
  func increase() -> Int { self + 1 }
  func decrease() -> Int { self - 1 }
}

// E: Event
enum Event {
  case increaseCount
  case decreaseCount
}


// R: Resources
// ...none required here
Architecture Metaphor
In order to really lean into the architecture metaphor, let’s try to draw comparisons between each aspect of SIMPLER and familiar concepts from the architecture of a house.
Scene → Rooms
We can think of scenes like we would rooms in a house. The decomposition of a house into rooms breaks up the space into a set of subspaces, used for different purposes and placed in ways to control the flow through the house. Inside of these spaces, we’ll want to do different things and have them look certain ways—making use of different furniture, decorations, appliances, media and materials.
In the same way, scenes are the top-level decomposition of our apps, dividing them into a number of different spaces. Their arrangement will control how we flow through the app, and the presence of interfaces and models will control how they look, and what we can do in them. We can divide our applications into a number of different contexts, to facilitate the range of desired behaviors.
We’ll represent scenes quite simply in our apps. In most cases, we can just use a naming scheme (CounterView, CounterModel, CounterEvent) that delineates the object as part of a scene. Alternatively, we can define and extend Scene enums, using a dot-delimited naming scheme.
// 1. naming scheme
struct CounterScene: View {}
CounterScene()


// 2. enum scheme
enum CounterScene {}
extension CounterScene {
  struct Display: View {...}
}
CounterScene.Display()
Interface → Furniture, Decorations
Inside our rooms, we act in certain ways, according to the furniture and materials present. Furniture helps to shape our interactions. Their arrangement will shape how we flow around them, how we move and conduct ourselves (sit, stand, recline). Around them, we place decorations to make the room’s appearance pleasing or meaningful.
In our apps, we’ll need means of shaping the interactions and appearance as well. We’ll refer to these as controls and displays, means of doing things and seeing things. Generally speaking, these are rectangular units within our scenes that display text and graphics, and handle gestures by sending events.
In game development, the structure of interfaces is called a “scene tree”, which is a hierarchical tree of objects. The same is true in app development; we define trees of interfaces. We can think of the leaves of these trees as content and controls. Content is purely text and graphics, while controls are text and graphics made functional. We can think of the branches of this tree as containers and chrome. Containers are organizers for a set of contained interfaces, arranged in structured ways like lists or grids, or less structured ways like canvases. Chrome interfaces are platform containers, like dialogs, sheets, toolbars, and popovers, which offer extra places for controls and content.
In our apps, we’ll use View structs to define these interfaces like in our counter app. We can decorate these views with modifiers, which will change the views style, or add functionality like gestures or animation.
Model → Media, Materials
In addition to decor, we often have a number of pieces of media, and varied materials—clothing, food, drinks, cleaning supplies, etc—inside of our rooms. This stuff represents things we collect and consume, things we use to clothe ourselves and create.
While interfaces handling doing and seeing things, models handle storing things (collections, consumptions, clothing, creations) as objects, remembering their values and allow sets of behaviors that will change their values.
Models help us to organize the information in our applications, structuring our data in ways that make it useful. We make use of numerous models throughout our apps, holding onto information for various amounts of time, in various locations.
We can think about where our models will live. The closer to the view, the more temporary the model. These are often pieces of information like which popovers are presented, or what the search text is. These small pieces of information, often related to how other information is presented, are stored in-memory, and most likely aren’t held onto after an app is closed.
On the other end, we have data that we want to persist for a long time. This is data we want to be available anytime we open the app. To accomplish this, we make use of the file system, storing information either in files or databases. Each app receives its own “siloed” section of the file system, where we can store information of our choosing. If we use files, we will need ways of encoding and decoding these models, and these models will need to be decoded to be queried. If we use databases, we will need to conform our types to match what the database can handle, but we gain rich query access to our models.
In order to make this data available to our interfaces, we’ll often use “property wrappers” that allow the models to take part in the reactivity of SwiftUI. Below, we outline the three major layers of models: local state, state stores, and database models. For stores and database models, we define an object observer (like @ObservedObject). Here, RealmSwift is used to define the database model.
// 1. Define inside View
struct StateView: View {
  @State var a: Int
  ...
}

// 2. Define outside View, in App Memory
class Store: ObservableObject {
  @Published var a: Int
}

struct StoreView: View {
  @ObservedObject var store: Store
  ...
}

// 3. Define outside View, inside Database
class Item: Object {
  @Persisted var a: Int
}

struct DatabaseView: {
  @ObservedRealmObject var item: Item
  ...
}
Pipe → Wiring, Piping
We can think of pipes as the wiring and plumbing within our architectures, helping us to send messages and data within and between the rooms of our app. Imagine we flip a light switch. We can think of messages being sent between the switch (control) and the light (display), and the pipe (or wire) that connects the two.
Message passing is a common technique in computer science for handling inter-object communication. We can imagine the radio. Some objects set up their own “channels”, and broadcast messages onto this channel. Other objects can choose which channels they will listen to, allowing them to receive and possibly react to broadcasted messages. These pipes easily facilitate connection between non-adjacent spaces within our apps, reducing the burden of data dependencies.
Swift offers us a number of tools for passing messages, and forming message channels: callbacks, notifications, delegates, KVO (key-value obeserving), and more recently, Combine publishers.
Combine is especially compelling given its powerful, flexible nature. It allows us to setup arbitrary sending and receiving locations within our app, allowing us to construct "lines of communication" between different objects and interests.
// define
let channel = PassthroughSubject<String, Error>()

// send
channel.send("Hello World")

// receive anywhere
channel.sink { message in /*handle message*/ }

// receive inside View
.onReceive(channel) { message in /*handle message*/ }
Logic → Utilities
We can think of logic as the stuff that powers the house, the water, electricity, internet and other utilities that power the house, make the sinks and toilets work, keeps the lights on, etc. These utilities lets us do stuff, like cook, wash, watch TV, change the channels, etc.
In our apps, logic is code that updates our models. Because SwiftUI is a reactive framework, changes in our models cause changes in our interfaces, which is how we see that things are working. A common pattern in computer science is the separation of concerns, in which we split up our code based on its purpose. We can think of how to break our apps into different sections of logic, and how we can define “protocols” for each of these.
We make use of logic in our apps by the ways we handle events. Stores keep track of large chunks of state, and know how to handle events, by mapping them to logic and generating state updates. We can think of logic as the message responses, the reactions to getting a message (usually involving the updating of logic).
Often we will apply logic in our event handlers or as functions/extensions on our model objects. If we wish to reuse logic in Swift, we can define protocols and extensions.
If you are familiar with C programming, we can loosely compare protocols to .h files, which declare the “abstracted” forms, or the names of the variables and functions, without implementing them. Extensions, on the other hand, are the .c files, which make the abstractions concrete. Objects wishing to implement certain logic can adopt protocols and make use of defined extensions, or can define their own custom implementations.
protocol Example {
// abstract form of the logic
  func example() -> String
}

extension Example {
// a concrete form of the logic
  func example() -> String {
    "Hello World :)"
  }
}

// adopting object
class An: Example {}

An().example() // "Hello World :)"
Event → Panels, Switches, Buttons, Handles
In order to control when our utilities are used, we use a number of control panels, switches, buttons, handles or other controller to turn on/off or control the level of a certain utility. When we turn the sink handle, it’s as if we send a waterOn event and as we adjust the handle, a changeWaterLevel(Double) event.
The event, or command, is a well-worn pattern in computer science, representing the concept of a message. The Gang of Four call them an “object-oriented replacement for callbacks”. Bob Nystrom calls them “reified method call[s]”. Events are “objectified callbacks”, made such by having a) a type, and b) a set of properties.
The easiest way to do this in Swift is through enums. Each case represents a different event type, and the associated values, if any, represents the set of properties.
enum Event {
  case message(sender: UUID, payload: Data)
}
Enums give us a convenient, lightweight way to describe the happenings in our app. We are free to declare as many event types, with whatever associated information, as we feel adequately represents the total space of events in our apps. Event handlers consume events and produce actions, by mapping events to logic. We saw an event handler above—a switch statement handling different event cases by triggering logic and updating state.
Resource → Appliances
Many of the conveniences of modern life are a result of the rise of household appliances, which ease daily activities like cooking and cleaning. We can imagine setting the temperature dial on an oven and placing a tray of cookies inside, or putting clothes in a washer and pressing start. These machines can be thought of as abstractions of logic, events and pipes. They are often connected to a power source, and use this power to to do some manual work automatically. The character of the work can be mediated through sending events to the appliance, often through buttons and dials.
Commonly, our apps require extra “services”. In general, these will be asynchronous activities, or background activities used to return data to the main application. These could range from smaller monitoring activities, like for device notifications (keyboard, orientation), to API calls and web services, to large computations or media processing.
In our architectures, these “appliances” bundle together logic (do things) with events and pipes (communicate back and forth). We can think of each of these resources as adding another update loop to our application, in the form of a messenger abstraction. We can either send messages to these resources, or listen for and receive messages back. In this structure, we can connect our main update loop to each resource loop by way of Pipes and Events, which allow the resource to act in their own timing.
Wrap Up
While it may feel especially verbose, especially in relation the the MVC-family of architectures, I believe SIMPLER gives a clearer set of “blueprinting” objects to architect applications according to their aspects of information, presentation and interaction.
- In maintaining the same “model” of understanding of data, SIMPLER is consistent with MVC-like architectures in terms of how it understands information.
- By making clearer how the application separates into separate locations (scenes), and the nature of the views that occupy these locations (interfaces), we gain a better structuring of the presenting layer.
- And by breaking the interaction layer into four components—messages (events), message channels (pipes), message responses (logic) and messenger abstractions (resources)—we gain a set of objects that clarifies the interaction, or update process.